Create your own dedicated server
Create your own Linux server, hosted yourself, use any PC or laptop, have 100% email deliverability, learn how to save on hosting expenses, unlimited websites.
We all want to have a cheap way to get online, in this tutorial you will learn how to build your own dedicated server with the latest technologies.
Firstly you need a PC, any old piece of junk will do, but if you want performance you need to buy a new computer, basically in between 500 to 600 dollars would be ok, you do not need video card performance, that is not used in a server, what you need is CPU power, fast memory and a MVM/SSD storage.
How to chose? Well, get the latest cheap version of CPU like Intel i5 of generation 10 at least (the generation is in the name of the processor, like 10400, that means 10’th generation, do not be fooled by i7, or whatever processor if the generation is old, keep in mind that an i3 10’th gen is better than a i7 4’th gen).
Now, memory and motherboard play a very important role in the system, more RAM do not mean better performance, look into speed of each, let me know if you really cannot decide, I’ll be happy to help you.
As for storage, buy a fairly performant MVM/SSD and all will work smooth.
So, let’s get started.
Firstly you will need a good ISP with a static IP, at least 100mbs upload is preferable.
We want to install the latest Centos server with Webmin and Virtualmin as the control panel.
Centos download page https://www.centos.org/download/ Get the latest version with the longest life span.
Put it on a USB using Rufus or whatever software you choose.
Install your server in UI mode or not, is up to you, but you can always disable UI using systemctl set-default multi-user.target to disable the UI server / X Server. If you want to use the graphical interface you can always use systemctl set-default graphical.target to enable it, but keep in mind if you make the server live you need to disable the graphical interface because it consumes resources even if not used.
After your Centos server is installed we want to get to business and install your webserver, Webin and Virtualmin is free and really up to the task, always donate a coffee to them if you can.
As root execute the following commands:
yum update
This will update all server software, hit y to download and install them
In this tutorial we will cover PPPoE (Point-to-Point Protocol over Ethernet) internet connection, if you have your internet connection set up and your static IP is assigned you can scroll down and continue with the tutorial, skipping this part.
yum install ppp
yum install NetworkManager-ppp
yum install perl-Devel-PPPort
These commands will install the software needed to connect to the internet via your ISP PPPoE protocol with an user and password.
Try ifup command and it will ask if you want to install it, if it’s there then nothing needs changing.
Important: Reboot your system! (just type reboot)
Run the nmtui command to start the built-in text-based user interface for the Network Manager.
Click the images to enlarge them.
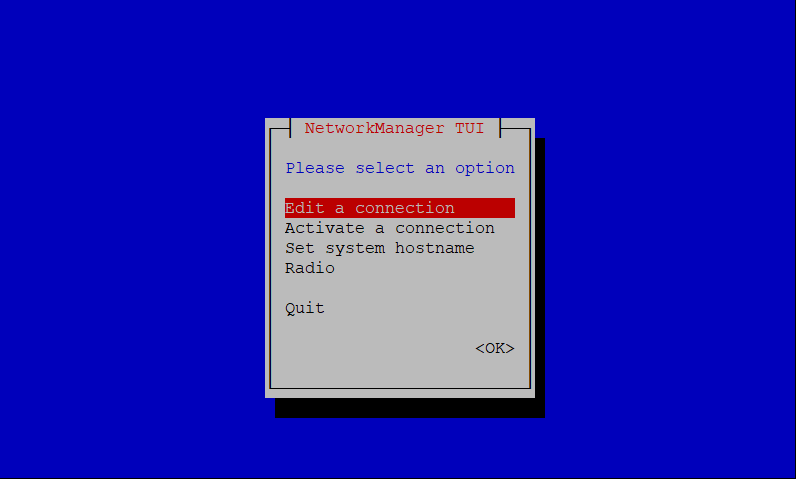
-delete all connections
-create DSL connection with user and password
-set to auto connect
-activate
Exit the user interface and reboot your system to make sure that the internet connection is available.
Virtualmin Installation
In terminal download and install Virtualmin, which will install Webmin too
wget https://software.virtualmin.com/gpl/scripts/virtualmin-install.sh
sh virtualmin-install.sh
If issues just add –unstable to the command sh virtualmin-install.sh –unstable
Use host.your_domain.com for the hostname, doesn’t matter if you get a warning, because we didn’t pointed it just yet.
After installation just do a system reboot to make sure all works as expected.
Open Virtualmin in your browser by navigating to https://localhost:10000 if you installed the server with gui or if you are on a different machine https://YOUR_SERVER_IP:10000 login as root and do the first time installation wizard, you can always redo it by navigating to Virtualmin >> System Settings >> Re-Check Configuration.
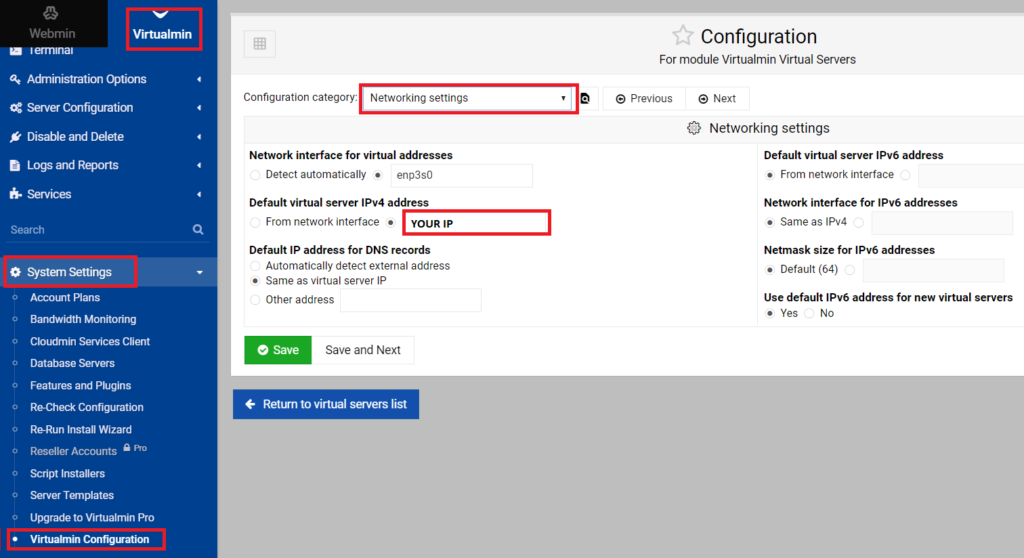
Go to Virtualmin >> System Settings >> Virtualmin Configuration >> Network Settings and set your static IP.
Now is time to install the CSF firewall which is one of the best firewalls in Linux.
dnf install perl
Follow the instructions provided here https://download.configserver.com/csf/install.txt
cd /usr/src
rm -fv csf.tgz
wget https://download.configserver.com/csf.tgz
tar -xzf csf.tgz
cd csf
sh install.sh
Next, test whether you have the required iptables modules:
perl /usr/local/csf/bin/csftest.pl
Don’t worry if you cannot run all the features, so long as the script doesn’t
report any FATAL errors.
sh /usr/local/csf/bin/remove_apf_bfd.sh
vim /etc/csf/csf.conf
TESTING = “0”
Navigate to ‘WebMin Configuration’ present in ‘WebMin’ menu
Click on ‘WebMin Modules’, which will bring you to an install, delete, clone section.
Click on Browse button on first option ‘Install from Local File’
Navigate to the below path and select the csfwebmin.tgz file. Hit Install.
/usr/local/csf/csfwebmin.tgz
Once done, hit ‘Refresh Modules’ present at bottom of sidebar. Let VirtualMin or WebMin calculate and then refresh the whole page
Navigate to ‘ConfigServer Security and Firewall’ present under System menu.
/etc/csf/csftest.pl
echo “YOUR_STATIC_IP” >> /etc/csf/ui/ui.allow
Changing the default ssh port IMPORTANT!
Open and edit the SSH daemon configuration file
Run the following command to open the sshd_config file:
[root@server-01 ~]# vim /etc/ssh/sshd_config
Use the arrow keys to scroll through the file until you locate the following text:
#Port 22
#AddressFamily any
#ListenAddress 0.0.0.0
#ListenAddress ::
Place the cursor on the line below #Port 22 and press the i key to enter Insert Mode.
Press the Enter key to create a new line and type Port <Specified Port Number>. Port 2021 is the new SSH port in the following example:
#Port 22
Port ANY_PORT_YOU_WANT <- maybe 34569
#AddressFamily any
#ListenAddress 0.0.0.0
#ListenAddress ::
Press the Esc key to exit Insert Mode. Next, quit vi by typing :wq and pressing the Enter key.
Bind SSH daemon to the new port
Install the policycoreutils package to bind the SSH daemon to the new SSH port by using the following command:
[root@server-01 ~]# yum install policycoreutils
Type y and press the Enter key to continue with the installation. When this task completes, add the following rules to ensure that the SSH daemon binds with the specified port:
[root@server-01 ~]# semanage port -a -t ssh_port_t -p tcp 34569
[root@server-01 ~]# semanage port -m -t ssh_port_t -p tcp 34569
Next restart the SSH daemon:
[root@server-01 ~]# systemctl restart sshd
Verify the bind to the new port
Ensure that the port changes took effect by using either the netstat or ss command as shown in the following example:
[root@server-01 ~]# ss -tlpn| grep ssh
LISTEN 0 128 0.0.0.0:34569 0.0.0.0:* users:((“sshd”,pid=28065,fd=4))
LISTEN 0 128 [::]:34569 [::]:* users:((“sshd”,pid=28065,fd=6))
[root@server-01 ~]# netstat -tlpn| grep ssh
tcp 0 0 0.0.0.0:34569 0.0.0.0:* LISTEN 28065 sshd
tcp6 0 0 :::34569 :::* LISTEN 28065 sshd
As you can see, both commands show that Port 34569 is now in place.
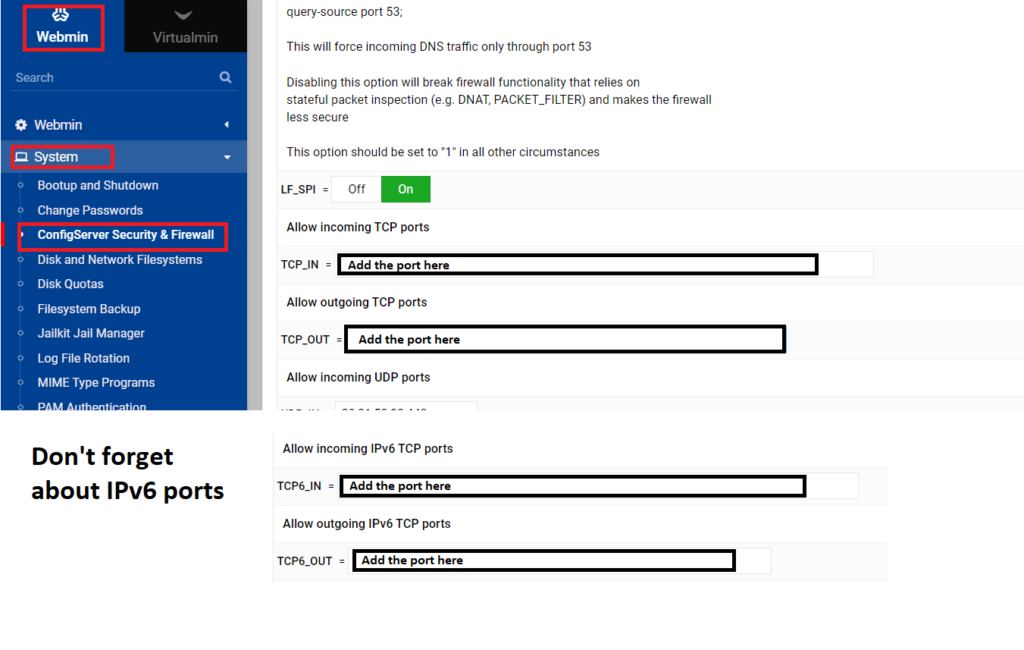
Update your firewall: ADD IN CSF THE PORT!
Just add the chosen port in the allowed port list like “,34569” at the end, don’t forget about IPv6.
Allow root login
1. Edit the /etc/ssh/sshd_config file with a text editor and find the following line:
#PermitRootLogin no
2. Change the no to yes and or simply put ‘#’ at the beginning of the line so that it reads :
#PermitRootLogin yes
3. Restart the sshd service:
# service sshd restart
Testing the ssh port
ssh root@YOUR_IP
ssh: connect to host YOUR_IP port 22: No route to host`
Now, by using the -p <Port Number> option, you should be able to log in successfully:
ssh root@YOUR_IP -p 34569
root@YOUR_IP’s password:
FTP not working by default with CSF
You need to add passive ports only in TCP IN for both ipv4 and ipv6 and the client must use passive mode.
https://support.configserver.com/en/knowledgebase/article/ftp-doesnt-work-with-csf-installed
Add the port range in CSF as you did for the ssh port in the format “,49152:65535”
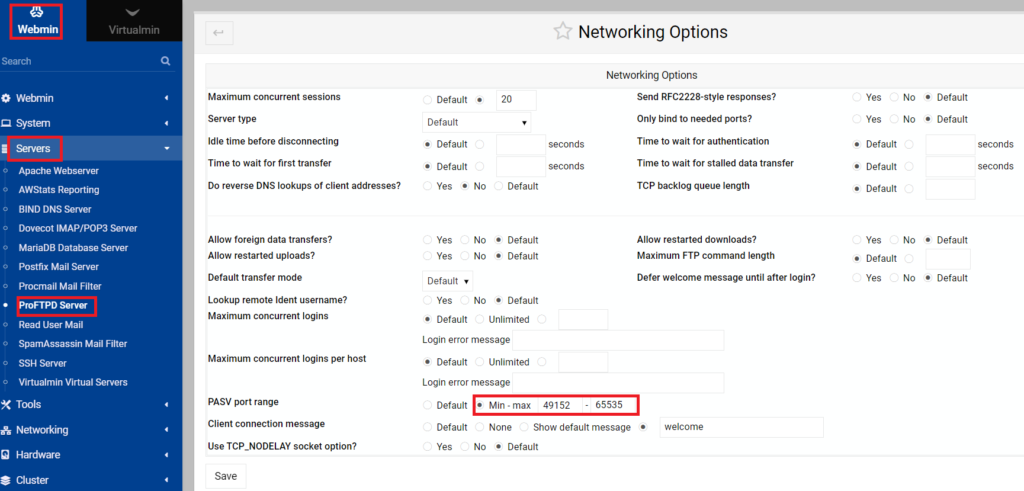
For pure-ftpd you could add the port range 49152:65535 to TCP_IN prts, can be seen in webmin servers >> proftpd >> networking.
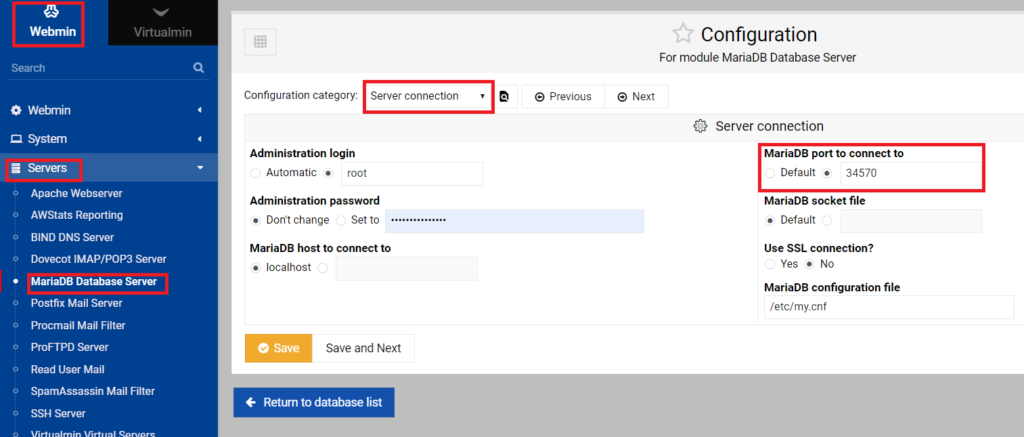
Change mysql port to 34570 from Webmin >> Mariadb >> MariaDB server configuration,
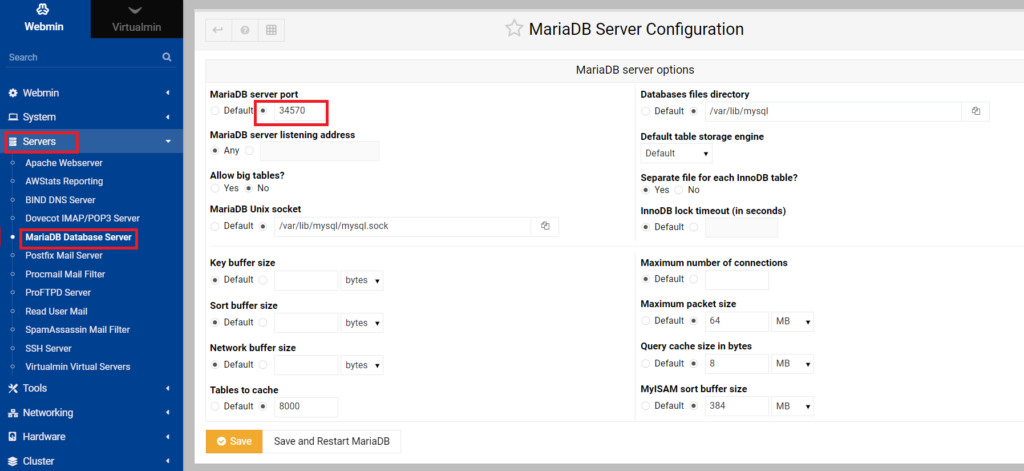
Then on the module page the top left gear icon select server connection and add port to MariaDB port to connect to.
Check server security
Navigate to Webmin >> System >> ConfigServer Security & Firewall and click on the Check Server Security Button.
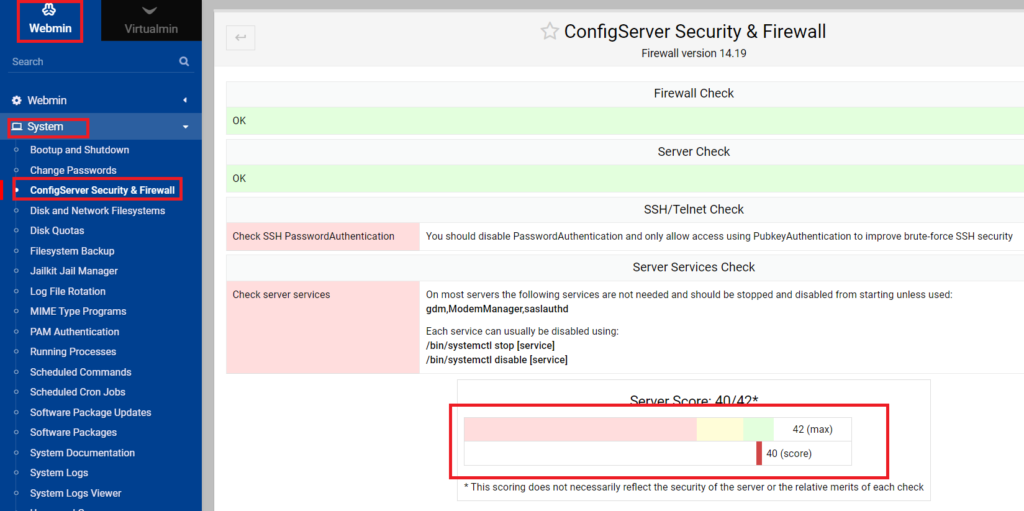
DO NOT disable gdm,ModemManager,saslauthd services like it says in CSF, do not try to have the top score of 42, because then you will have a 100% secure server which does nothing, some things are ment to be left alone in order for the system to work.
Multiple php versions
Install Remi repository and clear cache
/etc/os-release && dnf -y install https://rpms.remirepo.net/enterprise/remi-release-$(rpm -E %$ID).rpm && dnf clean all
dnf install php81-php-{cli,fpm,pdo,gd,mbstring,mysqlnd,opcache,curl,xml,zip}
Note: php81 should be replaced with the PHP version you want to install in the command above, i.e. php74
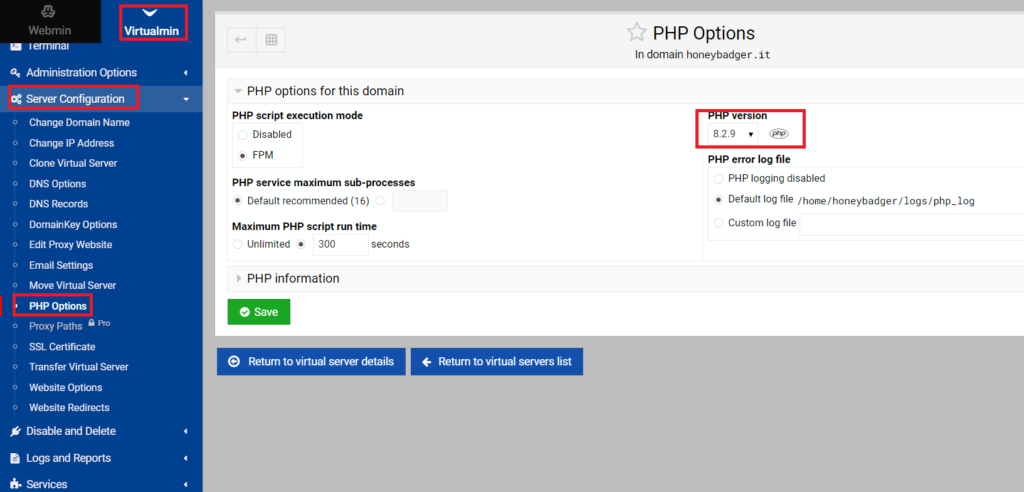
If you want to change the php version of an existing website navigate to Virtualmin >> Server Configuration >> PHP Options
Memcached installation
yum install memcached
yum install php*-memcached
systemctl start memcached.service
systemctl enable memcached
systemctl status memcached.service
Memcached can be used by different software to use memory cache.
Mounting a backup drive
create a folder BU
mkdir /BU
lsblk –fs /dev/sda1
get id, type and add to /etc/fstab
UUID=0118-D2AB /BU vfat defaults 0 0
You may use any editor to edit the filesystem table fstab.
Reboot and see if BU is mounted, you can use df -h to list all that is mounted and check the usage.
Backup time
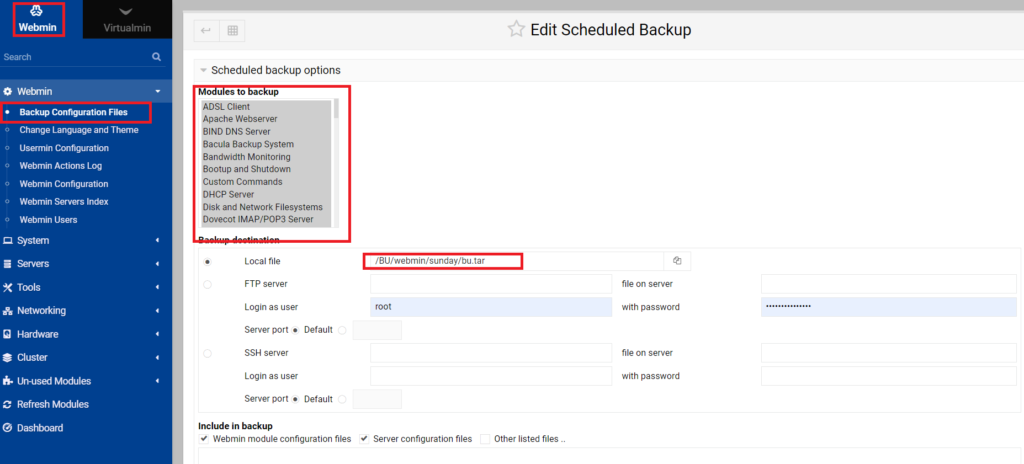
Navigate to Webmin >> Backup Configuration Files >> Scheduled backups and add a backup for each week day to be saved in /BU folder.
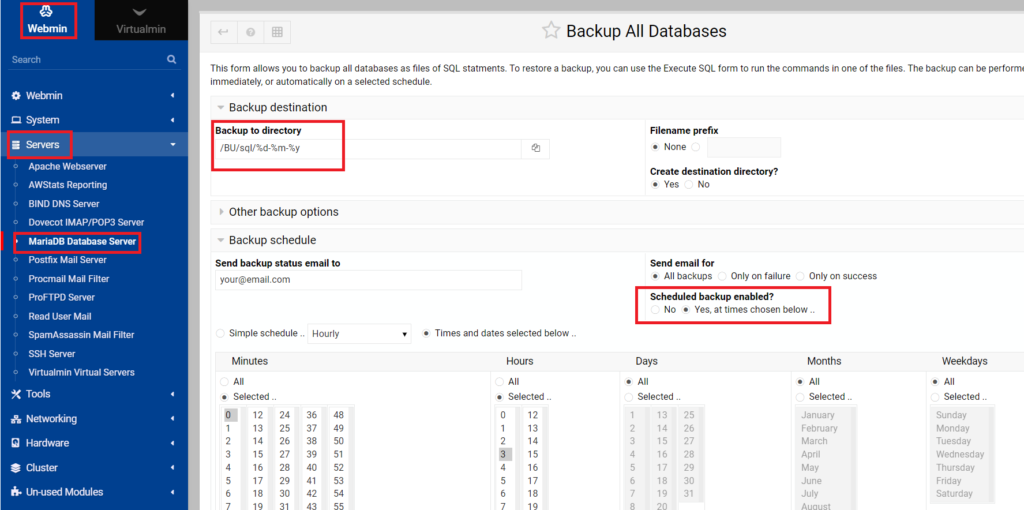
Backup the databases by navigating to Webmin >> Servers >> MariaDB Database Server navigate to the bottom of the page and click on the Backup Databases button, a new page will show where you need to set the backup directory like “/BU/sql/%d-%m-%y” click Yes on the Scheduled backup enabled? and select when to backup, in example minute 0, hour 3 and all days, months and weekdays
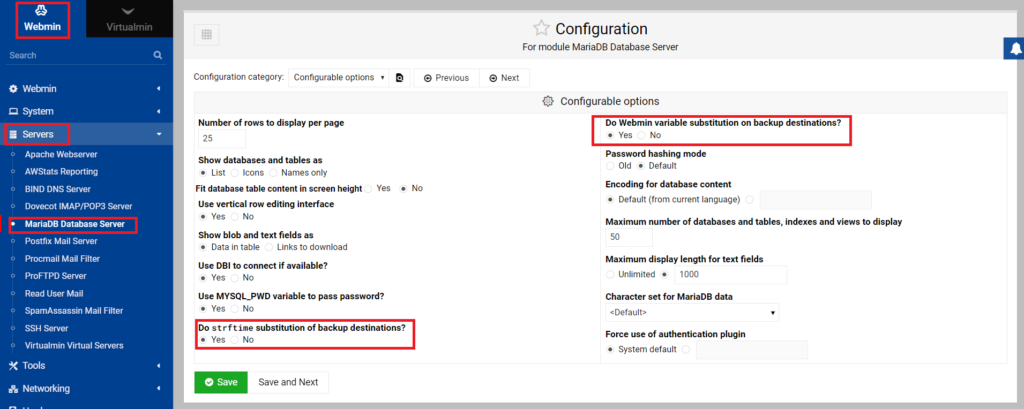
Navigate to Webmin >> Servers >> MariaDB Database Server and click on the top left conf gear icon and set the Do Webmin variable substitution on backup destinations? and Do strftime substitution of backup destinations? to Yes.
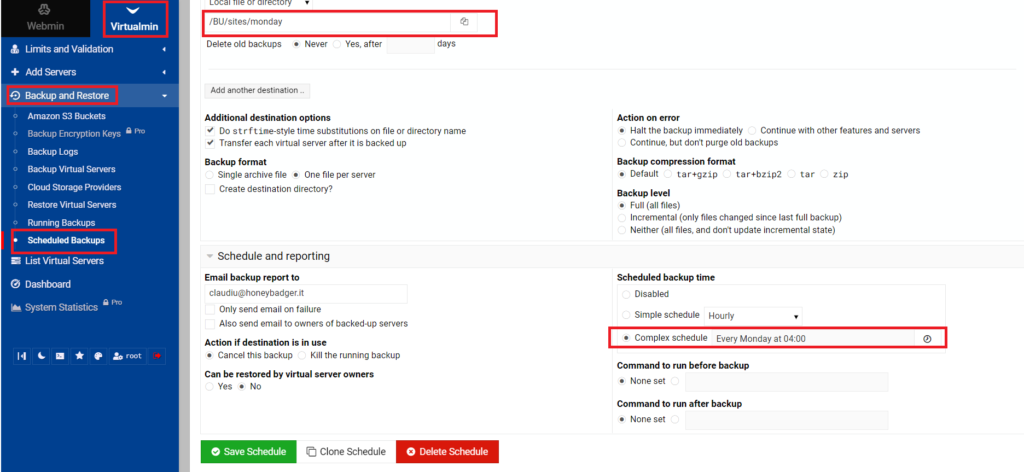
Navigate to Virtualmin >> Backup and Restore >> Scheduled Backups and create for each weekday a backup, also create a monthly one at the 1st of the month, select which websites to backup, where to save it /BU and at what time to do it.
Edit /etc/postfix/main.cf and find this line
#header_checks = regexp:/etc/postfix/header_checks
after it add this line
header_checks = regexp:/etc/postfix/list_unsub_header
Create the /etc/postfix/list_unsub_header file and put this into it
/^Content-Transfer-Encoding:/i PREPEND List-Unsubscribe: mailto:<sender-email-address>?subject=unsubscribe>”
Send an email to your ISP and ask them to add a Reverse DNS record for your STATIC_IP to point to host.your_domain.com, this is important for email deliverability.
So far we have a functional web server with firewall, default ports changed and backup system, now let’s create our first website.
DNS configuration
Having a Static IP allows us to host on our server as many websites as we want, in your web domain account (where you purchased the domain from) we need to set the DNS records to point to clowdflare (or any similar free service), you would need to create a free cloudflare account and add your website there.
In the cloudflare dns records you need to add an A record for your_doman.com and your_static_ip and set it to be dns only, you will need to add another A record for host and your IP (this will point host.your_domain.com to your server).
Add a CNAME record for www and a MX record for your_domain.com that points to mail.your_domain.com.
Add a TXT record for _adsp._domainkey with the value dkim=all, add a TXT record for default._domainkey with the value grabbed from Virtualmin >> Server Configuration >> DomainKey Options, scroll down to the DKIM DNS records and grab the value after default._domainkey IN TXT ( ”
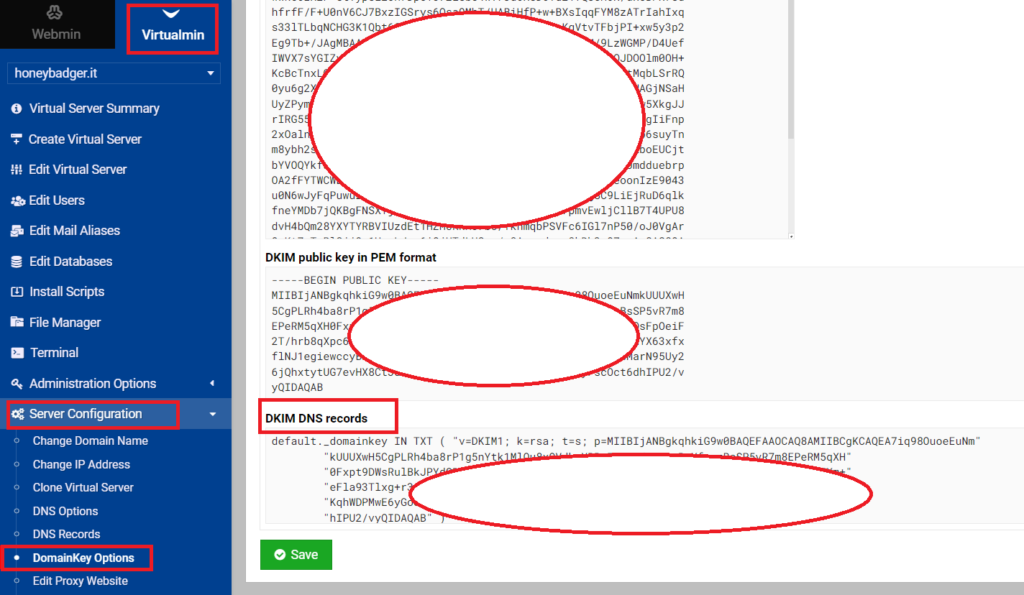
Keep in mind that this value should not have any new rows, it all must be in one row, just remove any ” and concatenate the strings to be one row.
Add a new TXT record for _dmarc with the value of v=DMARC1; p=reject; pct=100; adkim=r; aspf=r
Add a TXT record for your_domain.com with the value of v=spf1 a mx a:honeybadger.it ip4:your_static_ip ~all
Remember that all need to be DNS only.
At the bottom of the page you can see the DNS records you need to add for your domain in your domain account (where you pay for the domain name).
NS abby.ns.cloudflare.com
NS major.ns.cloudflare.com
First Virtual Server
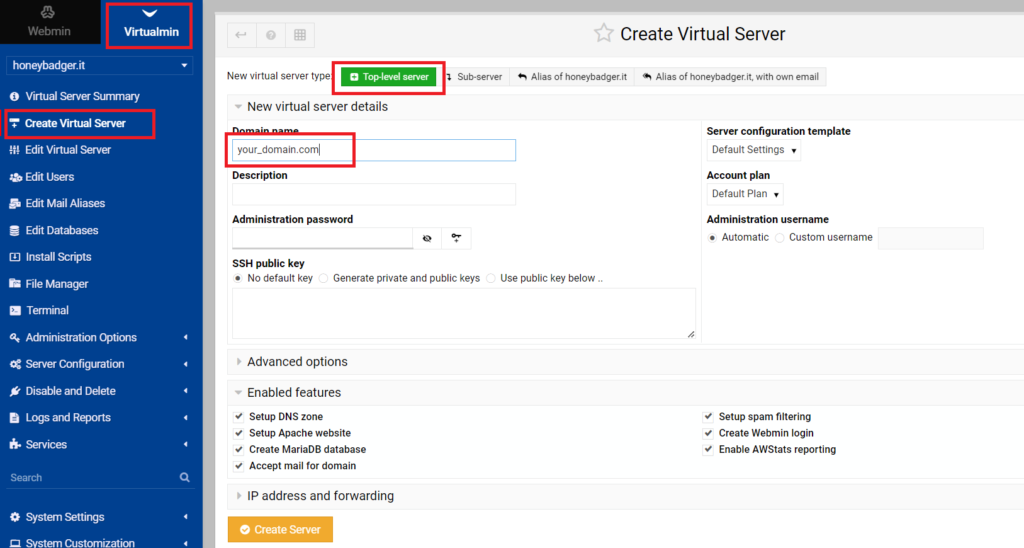
Navigate to Virtualmin and hit the Create Virtual Server button, input your_domain.com in the Domain name box and hit Create Server button at the bottom of the page. Now you will see some error from LetsEncrypt, don’t panik it’s ok, we did not setup all the domain names in DNS as the default Virtualmin LetsEncrypt request.
Navigate to Virtualmin, select your domain, go to Server Configuration >> SSL Certificate, click on the Let’s Encrypt tab, select the Domain names listed here and add your_domain.com and www.your_domain.com in the box and request the certificates. You would need to do this for host.your_domain.com too.

First email
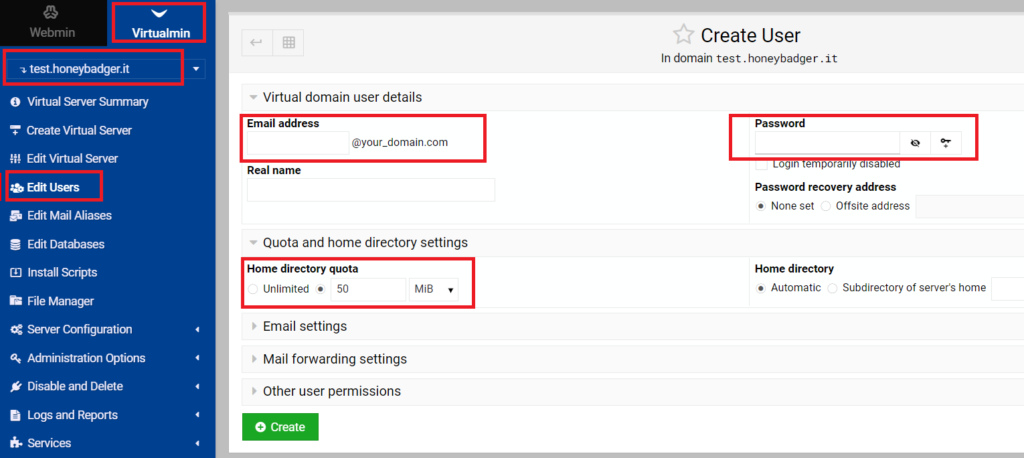
Navigate to Virtualmin >> select your domain >> Edit Users and click on the Add a user to this server button, input your desired email address and password for it, keep an eye on the limit (default is 50mb), maybe have it unlimited for yourself.
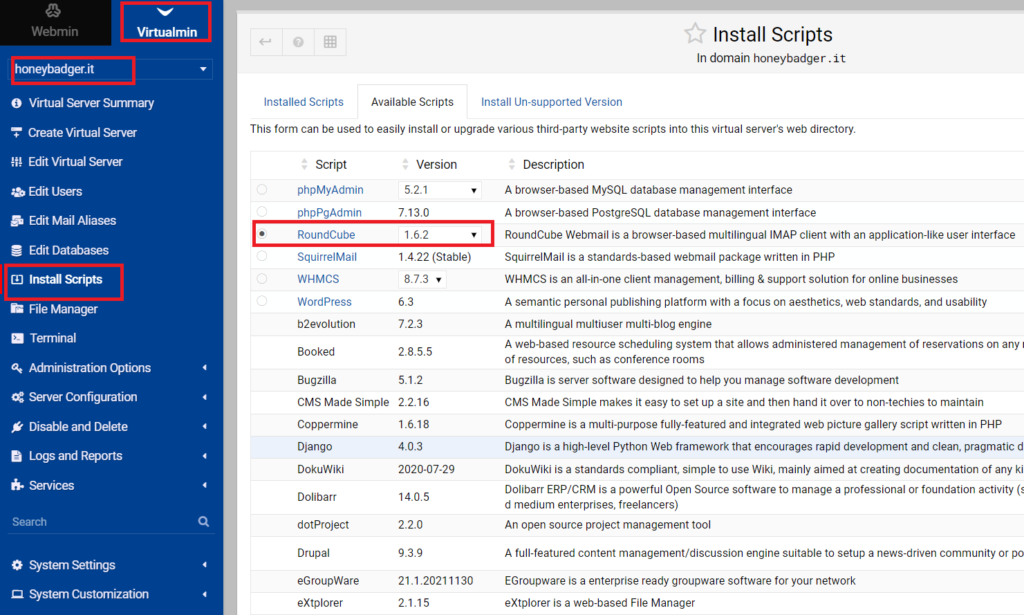
You could install round cube to use as an email client by navigationg to Virtualmin >> select your domain >> Install Scripts select Round cube and install, then it will be accesed on your_domain.com/roundcube with your email address and password.
Alternatively use Thunderbird or K9 Mail on your phone, use mail.your_domain.com as imap and smtp server and full email address and password to connect.
First website
As you did with roundcube you may do with wordpress and phpmyadmin, install them from Virtualmin >> Install Scripts.
That’s about it, if you run in any issues I could help, just contact me.